-
[React] Component Life Cycle / 컴포넌트 생명주기Frontend 2019. 8. 17. 15:28
컴포넌트 생명주기
모든 리액트 컴포넌트는 여러 종류의 Life Cycle Method를 가진다. Life Cycle이란 컴포넌트가 생성되어 소멸될 때까지의 일련의 과정들을 일컫는다. 이러한 Life Cycle 안에서 특정 시점에 코드가 호출되도록 설정할 수 있는데, 이 때 사용되는 메소드를 Life Cycle Method라고 한다.

1. Render()
다른 life cycle method는 상황에 따라 사용할 수도, 사용 안할 수도 있는 선택사항이지만 render 메소드는 모든 클래스 컴포넌트에서 반드시 있어야 하는 필수사항이다.
render는() 보통 JSX를 사용하여 사용자가 작성한 엘리먼트들을 DOM 노드로 변환해준다.
class App extends React.Component {
  render() {
    return <h1>Hello!</h1>;
  }
}
만약 Boolean값이나 null 등은 아무것고 렌더링하지 않는다.
그렇기때문에 state boolean값과 return this.state.test && <Child />와 같은 패턴을 이용하여
어떤 요소를 쉽게 보여줬다 숨겼다 할 수 있다.
class App extends React.Component {
  constructor(props) {
    super(props);

    this.state = {
      isShown: false
    }

    this.handleClick = this.handleClick.bind(this);
  }

  handleClick() {
    if (!this.state.isShown) {
      this.setState({isShown: true});
    } else {
      this.setState({isShown: false});
    }
  }

  render() {
    return (
      <>
        <h1>Hello!</h1>
        <button
          type="button"
          onClick={this.handleClick}
        >
          Show and Hide
        </button>
        {this.state.isShown && (
          <p>
            안녕하세요!
          </p>
        )}
      </>
    );
  }
}
만약 어떤 버튼을 클릭할 때마다,
<p>안녕하세요!</p>가 보였다가 안보였다가 하는 코드를 작성한다면
위와 같이 작성할 수 있을 것이다.
button을 클릭할 때마다 this.state.isShown 변수의 Boolean값이 변경되고,
그 값이 참일 때에만 <p>안녕하세요!</p>가 보여지게 된다.

2. constructor()
위 코드를 보면 constructor() 메소드가 사용되었다.
constructor는 메소드를 바인딩하거나 state를 초기화할 때 사용된다.
이 메소드는 컴포넌트가 처음 생성될 때 가장 먼저 호출된다.
class App extends React.Component {
  constructor(props) {
    super(props);

    this.state = {
      isShown: false
    }

    this.handleClick = this.handleClick.bind(this);
  }
  // ...
}
constructor를 사용할 떄는 반드시 super(props)를 호출해야하며
이를 생략할 경우 this.props가 생성자 내에 정의되지 않아 버그로 이어질 수 있다.
위 코드를 보면 this.state = {}를 사용하여 local state를 초기화해주고 있다.
state의 값을 직접 할당할 수 있는 유일한 곳이 바로 constructor() 메소드 내부이다.
이 외에는 setState()를 사용해서 state 값을 변경할 수 있다.
또한 this.handleClick = this.handleClick.bind(this);로 이벤트 처리 메소드를 바인딩하고 있는데
만약 이 이벤트를 하위 컴포넌트에 props로 전달하여 사용할 때 this를 확실하게 지정해주기 위해 꼭 필요한 과정이다.
render() {
  return (
    <>
      <h1>Hello!</h1>
      <button
        type="button"
        onClick={this.handleClick.bind(this)}
      >
        Show and Hide
      </button>
      {this.state.isShown && (
        <p>
          안녕하세요!
        </p>
      )}
    </>
  );
}
이 처리를 생략하더라도 render에서 함수를 위 코드처럼 onClick이벤트에 직접 bind할 수도 있지만
리액트는 constructor에서 해주는 것을 권장하고 있으므로 되도록이면 constructor에서 하는 것으로..
3. componentDidMount()
이 메소드는 render()가 호출되고 컴포넌트가 마운트될 직후, 즉 트리에 삽입된 직후에 호출된다.
주로 외부 데이터를 불러오기 위한 네트워크 요청을 보낼 때 이 메소드를 사용한다.
만약 componentDidMount()에서 데이터를 불러온 후에 setState()를 실행하면 render()가 다시 호출된다.
성능 이슈가 될 수 있으니 이 점을 항상 고려해서 작업해야한다.
class App extends React.Component {
  constructor(props) {
    super(props);

    this.state = {
      list: []
    }

    this.getNumbersPromise = this.getNumbersPromise.bind(this);
  }

  componentDidMount() {
    this.getNumbersPromise()
      .then(res => {
        this.setState({list: res});
      });
  }

  getNumbersPromise() {
    return new Promise((resolve, reject) => {
      setTimeout(() => {
        resolve([1, 2, 3, 4, 5]);
      }, 1000);
    })
  }

  render() {
    console.log('===== RENDER ===== ', this.state.list);
    if (!this.state.list.length) return null;

    return (
      <>
        <h1>Hello!</h1>
        <ul>
          {this.state.list.map(num => <li key={num}>{num}</li>)}
        </ul>
      </>
    );
  }
}
위와 같이 componentDidMount() 메소드 안에서
1초 후에 숫자 배열을 resolve하는 프로미스를 실행하고
응답을 받으면 그 배열을 list state의 value로 업데이트한다.
그러면 render()가 처음 호출되었을 때는 this.state.list가 빈 배열이고
1초 후 두 번째 호출되었을 때는 [1, 2, 3, 4, 5]로 바뀌어 있는 것을 확인할 수 있다.

4. shouldComponentUpdate(nextProps, nextState)
shouldComponentUpdate는 컴포넌트가 업데이트되어 렌더링 되기 전에
state나 props의 변화를 인자로 받아서 렌더링 여부를 제어할 수 있도록 도와준다.
기본값인 true를 리턴하면 렌더링이 이루어지고,
false를 리턴하면 렌더링이 이루어지지 않는다.
이 메소드는 성능 최적화를 위한 것이므로,
단순히 렌더링을 방지하는 목적으로 사용할 경우에는 버그로 이어질 수 있다.
주로 이 메소드는 PureComponent를 사용하여 작성하는 것이 좋다고 React 문서에 적혀있으니 참고하자.
class App extends React.Component {
  constructor(props) {
    super(props);

    this.state = {
      list: []
    }

    this.getNumbersPromise = this.getNumbersPromise.bind(this);
  }

  componentDidMount() {
    console.log('===== componentDidMount =====')
    this.getNumbersPromise()
      .then(res => {
        this.setState({list: res});
      });
  }

  shouldComponentUpdate(nextProps, nextState) {
    console.log('===== shouldComponentUpdate =====')
    console.log('nextState: ', this.state.list, nextState);

    return nextState.list.length === 5;
  }

  getNumbersPromise() {
    return new Promise((resolve, reject) => {
      setTimeout(() => {
        resolve([1, 2, 3, 4, 5]);
      }, 1000);
    })
  }

  render() {
    console.log('===== RENDER =====');
    console.log('this.state.list: ', this.state.list)

    return (
      <>
        <h1>Hello!</h1>
        <ul>
          {this.state.list.map(num => <li key={num}>{num}</li>)}
        </ul>
      </>
    );
  }
}
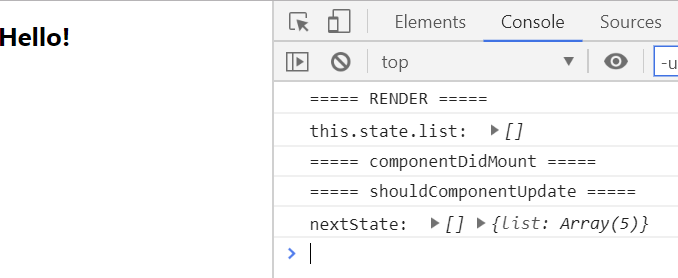
위 코드를 보면 componentDidMount에서 state.list의 값이 []에서 [1, 2, 3, 4, 5]로 변경되고,
그 값에 의해 render가 실행되기 직전에 shouldComponentUpdate가 실행된다.

state.list의 length가 5이므로 true를 리턴하여 render가 실행된다.
만약에 return문을 this.state.length > 5로 고친다면 false가 리턴되고 render가 실행되지 않는다.

5. componentDidUpdate(prevProps, prevState, snapshot)
이 메소드는 갱신이 일어난 직후에 호출되며, 최초 렌더링에서는 호출되지 않는다.
이 메소드는 주로 아래와 같은 상황에서 사용되면 좋다.
1. 컴포넌트가 갱신되었을 때, DOM을 조작
2. 이전과 현재의 props를 비교하여 네트워크 요청을 보내는 작업
componentDidUpdate()에서 setState()를 즉시 호출할 수도 있지만
조건문을 주지 않으면 무한 반복이 발생할 수 있으므로 주의해야 한다.
또한 추가적인 rendering을 유발하기 때문에 성능 이슈에 영향을 줄 수 있다.
componentDidUpdate의 세 번째 인자인 snapshot은
getSnapshotBeforeUpdate()를 구현했을 경우 이 때 반환된 값이 snapshot인자로 전달되며
반환값이 없다면 undefined를 가진다.
class App extends React.Component {
  constructor(props) {
  	console.log('===== constructor =====');
    super(props);

    this.state = {
      list: [],
      id: null
    }

    this.getidPromise = this.getidPromise.bind(this);
  }

  componentDidMount() {
    console.log('===== componentDidMount =====');
    this.getidPromise()
      .then(res => {
        this.setState({
          id: res.id
        });
      });
  }

  shouldComponentUpdate(nextProps, nextState) {
    console.log('===== shouldComponentUpdate =====');
    console.log('nextState: ', this.state, nextState);

    return nextState.id;
  }

  componentDidUpdate(prevProps, prevState, snapshot) {
    console.log('===== componentDidUpdate =====');
    console.log('prevProps: ', prevProps);
    console.log('prevState: ', prevState);
    console.log('snapshot: ', snapshot);

    if (prevState.id !== this.state.id) {
      this.getNumbersPromise(this.state.id)
        .then(res => {
          this.setState({list: res.data});
        });
    }
  }

  getidPromise() {
    return new Promise((resolve, reject) => {
      setTimeout(() => {
        resolve({id: 'julia123'});
      }, 1000);
    })
  }

  getNumbersPromise(id) {
    const data = {
      'hello123': [9, 8, 7, 6, 5],
      'julia123': [1, 2, 3, 4, 5]
    }

    return new Promise((resolve, reject) => {
      setTimeout(() => {
        resolve({data: data[id]});
      }, 1000);
    });
  }

  render() {
    console.log('===== RENDER =====');
    console.log('this.state: ', this.state);

    return (
      <>
        <h1>Hello! {this.state.id}</h1>
        <ul>
          {this.state.list.map(num => <li key={num}>{num}</li>)}
        </ul>
      </>
    );
  }
}
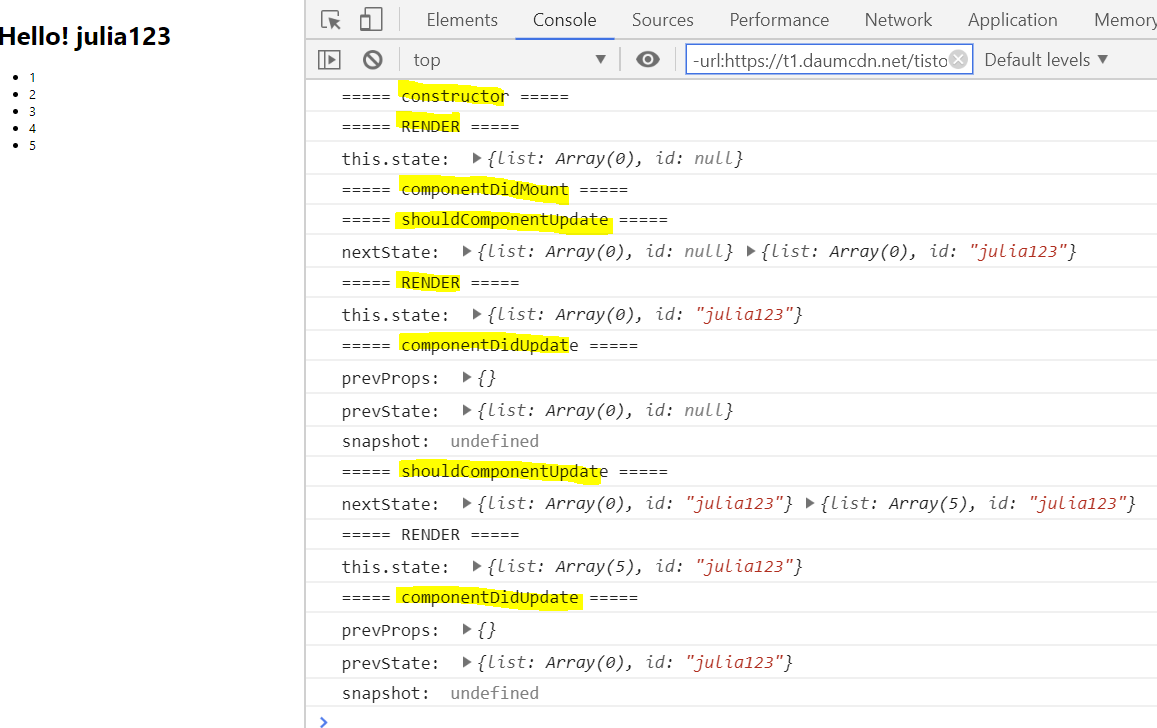
위 코드는 어떤 식으로 호출되는지 확인하기 위해 만든 단순 연습 코드이다.
1. 먼저 constructor가 실행되어 state의 초기값이 설정되고 이벤트 메소드가 바인딩된다.
2. render가 실행된다. h1과 ul 태그가 DOM 트리에 꽂힌다.
3. componentDidMount가 실행되어 id 정보를 가져오는 promise를 실행하고 반환받은 id 정보를 state에 업데이트한다.
4. shouldComponentUpdate가 실행되어 추가적인 렌더링을 할지 검사한다. true가 return된다.
5. 위에서 true가 리턴되었으므로 render가 다시 실행된다. 이번엔 this.state.id값이 있으므로 h1태그에 렌더된다.
6. componentDidUpdate가 실행되어 이전 id와 지금 id가 같은지 검사하고 같지 않으므로 지금 id에 대한 배열 데이터를 가져오는 프로미스를 실행한다. 배열 데이터를 받아 state를 업데이트한다.
7. shouldComponentUpdate가 다시 실행되어 render를 추가로 할지 여부를 검사한다. true를 리턴한다.
8. 다시 render가 실행되고 이번엔 배열에 요소가 있으므로 1, 2, 3, 4, 5를 <li> 태그에 넣어 화면에 출력한다.

6. ComponentWillUnmount()
이 메소드는 컴포넌트가 마운트 해제되어 제거되기 직전에 호출된다.
네트워크 요청 취소나 타이머 제거, 이벤트 리스너 제거 등등의 정리 작업들을 수행할 수 있다.
이 메소드를 끝으로 컴포넌트는 다시 렌더링 되지 않기 때문에 이 안에서 setState()를 호출하면 안된다.
let timer;

class Box extends React.Component {
  componentWillUnmount() {
    console.log('=== componentWillUnmount ===');
    clearInterval(timer);
  }

  render() {
    this.props.timer(0);

    return (
      <p>Timer Started</p>
    );
  }
}

class App extends React.Component {
  constructor(props) {
    super(props);

    this.state = {
      isShown: false
    }

    this.timer = this.timer.bind(this);
    this.handleClick = this.handleClick.bind(this);
  }

  handleClick() {
    if (!this.state.isShown) {
      this.setState({isShown: true});
    } else {
      this.setState({isShown: false});
    }
  }

  timer(num) {
    console.log('=== Timer Started ===');
    timer = setInterval(() => {
      console.log(num++);
    }, 1000);
  }

  render() {
    return (
      <>
        <h1>Hello!</h1>
        <button
          type="button"
          onClick={this.handleClick}
        >
          Show and Hide
        </button>
        {this.state.isShown ? (
          <Box
            timer={this.timer}
          />
        ) : <p>Box Component Unmounted</p>}
      </>
    );
  }
}
위 예제코드를 살펴보면 button을 클릭하면 this.state.isShown 변수가 true가 되어
Box 컴포넌트가 렌더링되는데, box 컴포넌트는 timer 함수를 실행하여 console.log()에 1초 간격으로 숫자를 찍는다.
그리고 Box 컴포넌트가 unmount될 때 clearInterval을 통해 timer 호출을 종료하도록 되어있다.
그러므로 button을 다시 한 번 클릭하면 state의 isShown 변수가 다시 false가 되어
Box 컴포넌트가 unmount되고, 콘솔 창에 숫자가 더 이상 찍히지 않게 된다.

 반응형
반응형'Frontend' 카테고리의 다른 글
[React] 리덕스 (Redux) 이해하기 (609) 2019.08.24 [React] React Hook을 이용한 data fetching (609) 2019.08.18 [JS/Asynchronous] Async / Await 다루기 (609) 2019.08.10 [JS/Asynchronous] Promise / Promise.all(), Promise.race() 정리 (609) 2019.08.10 [JS/Pattern] 대표적인 자바스크립트, 디자인 패턴 정리 (Javascript, Design Pattern) (609) 2019.08.01 COMMENT